Crochet Skunk Earflap Hat

Crochet Skunk Hat

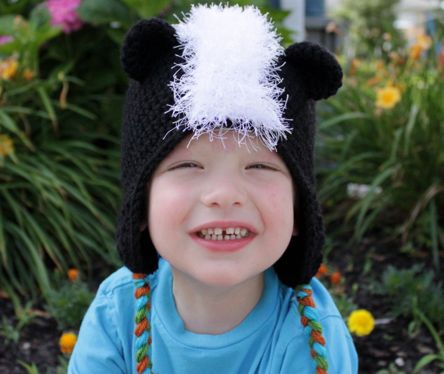
Look at that little stinker – isn’t he cute?!

Another fun hat you can make with my free Versatile Earflap Hat Pattern is a skunk. Simply follow the instructions for the size you would like to make completely in black yarn, then follow the additional instructions below.

White Stripe

Here is a little illustration for how I made the fuzzy white stripe for my skunk hat. First decide how wide you would like your stripe to be. For this child size hat, I made the stripe 8 stitches wide.


Holding the hat upside down with the front facing you, attach your yarn so that your stipe will be centered across the front of the hat. I used Lion Brand Fun Fur (but any eyelash or fuzzy yarn should work fine) and an I hook.


Sc across the front of the hat as wide as you want your stripe. Then chain 1 and turn your work.


* Sc across, ch 1 and turn* Repeat until…


…the stripe can flip over the top and meet the back edge of the hat. Fasten off and sew the end of the stripe to the center back edge. At this point I also tacked the stripe to the hat with a stitch every inch or so along both edges of the stripe. You can do this or just leave it – whatever you want.


Next I tried to fluff up the Fun Fur a little. There are two ways I like to do this. One way is to use a sewing pin to pull up some of the fur that gets caught in the stitches, and the other way is to lightly brush the stripe with a clean wire pet brush (I swear the white fuzz in the picture is yarn from my fluffy cloud pom poms and not from a pet).

Ears (make 2)

Making the ears is next. Use your black yarn and an H hook. When the ears are completed, squish them in half, position them on the hat and sew in place.

0-3 Months, 3-6 Months and 6-12 Month Sizes

  • Round 1: 6 Sc in a magic circle; do not join, use a stitch marker at the end of rounds if you need to. (6)
  • Round 2: 2 Sc in ea st around; do not join. (12)
  • Round 3: * 2 Sc in next st, sc in next 3 sts * repeat around; do not join. (15)
  • Round 4: Sc in each st around; do not join. (15)
  • Round 5: * Sc2tog, sc in next 3 sts * repeat around; do not join. (12)Sl st in next st and fasten off, leaving a long tail for sewing the ear to the hat.

Toddler, Child and Teen/Adult Sizes

  • Round 1: 6 Sc in a magic circle; do not join, use a stitch marker at the end of rounds if you need to. (6)
  • Round 2: 2 Sc in ea st around; do not join. (12)
  • Round 3: * 2 Sc in next st, sc in next st * repeat around; do not join. (18)
  • Round 4-5: Sc in each st around; do not join. (18)
  • Round 6: * Sc2tog, sc in next 4 sts * repeat around. (15) Sl st in next st and fasten off, leaving a long tail for sewing the ear to the hat.

If you choose, add some braids, tassels or pom poms to the earflaps on your hat and you are done! Thanks for stopping by today and make sure to check back midweek for the newest release in my pattern store – the Safari Helmet Pattern.

Crochet Ladybug Earflap Hat

For more summer fun, I made a ladybug hat to share with you this week using my free Versatile Earflap Hat Pattern. I only had time to make a newborn size, but I think that is pretty appropriate considering they are the only ones who would possibly be wearing earflap hats this time of year. Needless to say, I didn’t have a model for newborn size, but I think you’ll agree it would look pretty darn cute!

This hat is super simple to make, and it is easy to modify the pattern to change it into a ladybug. The modifications are the same for all sizes. If you haven’t downloaded the pattern yet, you can do it here, and then just make the following changes:

  • Work all rounds in red (I used Vanna’s Choice in Scarlet – a little brighter than my favorite red, Cranberry, from that line – just perfect for a ladybug).
  • Work both earflaps and both edgings in black.
  • Add spots. For this hat I made four circles of 6 sc in a magic circle, two circles of 7 hdc in a magic circle and two circles or 8 dc in a magic circle. If you like the look of these spots and need help making a magic circle, check out this post. I’m not terribly happy with my spots, for as much as I tried to sew them flat, I think they are too puffy. Next time I will opt for cutting circles from felt and sewing those to the hat instead (which will be much easier anyway).
  • For each antenna, I made a chain of 9, slip stitched in the second chain from the hook and in each chain across. Then I fastened off and attached the antennae with the loose ends.
  • You can finish off your hat by adding braids, tassels or pom poms to the center of each earflap if you like. Or you can just leave them plain. I haven’t decided what to do yet. What would you choose?

I hope you have enjoyed this hat. If you really love ladybugs, be sure to check out the Ladybug Hat (with convertible earflaps) in my pattern store – it is a lot of fun! Thanks for stopping by and have a great week!!

Crochet Bumble Bee Hat Pattern

Summer is officially here and it’s time for more summer-inspired versions of my free Versatile Earflap Hat Pattern. This bumble bee is quite a bit cuter than any bumble bees you’ll find in nature, and you can make this hat for your cuties too by following the instructions below. Have fun crocheting!

To make this hat, follow the instructions in my free hat pattern available for download here, changing colors as noted below.

0-3 Months

  • Work rounds 1 through 3 in yellow
  • Switch to black for rounds 4 & 5
  • Switch to yellow for rounds 6 & 7
  • Switch to black for rounds 8 & 9
  • Switch to yellow for rounds 10 & 11
  • Switch to black for earflaps and both edgings

3-6 Months

  • Work rounds 1 through 4 in yellow
  • Switch to black for rounds 5 & 6
  • Switch to yellow for rounds 7 & 8
  • Switch to black for rounds 9 & 10
  • Switch to yellow for rounds 11 & 12
  • Switch to black for earflaps and both edgings

6-12 Months

  • Work rounds 1 through 5 in yellow
  • Switch to black for rounds 6 & 7
  • Switch to yellow for rounds 8 & 9
  • Switch to black for rounds 10 & 11
  • Switch to yellow for rounds 12 & 13
  • Switch to black for earflaps and both edgings

Toddler

  • Work rounds 1 through 7 in yellow
  • Switch to black for rounds 8 & 9
  • Switch to yellow for rounds 10 & 11
  • Switch to black for rounds 12 & 13
  • Switch to yellow for rounds 14 & 15
  • Switch to black for earflaps and both edgings

Child

  • Work rounds 1 through 6 in yellow
  • Switch to black for rounds 7 through 9
  • Switch to yellow for rounds 10 through 12
  • Switch to black for rounds 13 through 15
  • Switch to yellow for rounds 16 through 18
  • Switch to black for earflaps and both edgings

Teen/Adult

  • Work rounds 1 through 8 in yellow
  • Switch to black for rounds 9 through 11
  • Switch to yellow for rounds 12 through 14
  • Switch to black for rounds 15 through 17
  • Switch to yellow for rounds 18 through 20
  • Switch to black for earflaps and both edgings

For the antennae on this child size hat, I made a chain of 15, then slip stitched in the second chain from the hook and in each chain across. Then I fastened off and used the loose ends to tie the antennae on the hat. Last, I tied a knot in the top of each antenna. I think a chain of 15 is a good length for any size hat, but you can always use whatever length suits your preference. The antennae are somewhat floppy, but they will hold their shape for a few seconds if you are trying to get pictures. They are still super cute, even floppy.

Thanks for stopping by! If you have any questions about this hat or anything at all, please don’t hesitate to email me at email hidden; JavaScript is required.

Happy Mother’s Day!

Wow! I can’t believe it has been nearly a month since I posted here. Being a mom sure has you going in a million directions all at once!

I just wanted to pop in today to say that even though it has been quiet around here lately, I have still been working on more fun stuff to share with you. In the meantime, I am offering 30% off any purchase from my pattern store today only, no coupon code required. Happy Mother’s Day!

Crochet Watermelon Hat

Here is a fun variation on my Versatile Earflap Hat Pattern for summer – a Watermelon Hat. I’m in one of those phases in my life where it seems like everyone I know is having a baby, and this hat will make such a cute little photo prop for those summer newborns.

The variation for this hat is really simple and will be the same for all sizes. You can download the free pattern for the basic hat here, and then read on for instructions to change the basic hat into a watermelon hat.

Begin by crocheting the hat in either pink or red from the first round all the way to the next-to-last round (example: rounds 1-10 on the 0-3 month size). Change to white for the last round, and then work the earflaps and both edgings in green. Finish the hat off by stitching “seeds” all over, and adding either braids, pom poms or tassels to the earflaps. I made this hat in Vanna’s Choice Yarn in Rose, White, Kelly Green and Espresso.

Thanks for stopping by and have a great week!

Big Button Flowers – Set 2 Pattern Winners Announced

Thank you everyone for entering to win my latest pattern, Big Button Interchangeable Flowers – Set 2! I really appreciate you all being fans on Facebook, subscribing to my newsletter and sharing the giveaway. Don’t forget that this pattern will be 30% off through April 6th in the pattern store (just in case you didn’t win and are looking for a deal)!

And the winners are….


Crochet Rainbow Hat Pattern

This week’s hat variation is super fun and I am so excited to share it! I have really enjoyed coming up with different variations of my free Versatile Earflap Hat Pattern and I hope you have enjoyed them too.

The idea for this rainbow hat actually came to me when I was thinking of St. Patrick’s Day hat ideas, but I wish I would have thought of it way back in December for my rainbow-loving niece’s Christmas present. My favorite part – the fluffy cloud pom poms on the earflaps.

To make this hat, follow the instructions in my free hat pattern available for download here, changing colors as noted below. Finish it off by adding a pom pom to each earflap. Want those clouds extra puffy? All you need to do is brush your pom pom out with a wire brush (like a clean, new pet brush) and then trim it into shape.

0-3 Months

  • Work rounds 1 through 3 in red
  • Switch to orange for rounds 4 & 5
  • Switch to yellow for rounds 6 & 7
  • Switch to green for rounds 8 & 9
  • Switch to blue for rounds 10 & 11
  • Switch to purple for earflaps and both edgings

3-6 Months

  • Work rounds 1 through 4 in red
  • Switch to orange for rounds 5 & 6
  • Switch to yellow for rounds 7 & 8
  • Switch to green for rounds 9 & 10
  • Switch to blue for rounds 11 & 12
  • Switch to purple for earflaps and both edgings

6-12 Months

  • Work rounds 1 through 5 in red
  • Switch to orange for rounds 6 & 7
  • Switch to yellow for rounds 8 & 9
  • Switch to green for rounds 10 & 11
  • Switch to blue for rounds 12 & 13
  • Switch to purple for earflaps and both edgings

Toddler

  • Work rounds 1 through 7 in red
  • Switch to orange for rounds 8 & 9
  • Switch to yellow for rounds 10 & 11
  • Switch to green for rounds 12 & 13
  • Switch to blue for rounds 14 & 15
  • Switch to purple for earflaps and both edgings

Child

  • Work rounds 1 through 6 in red
  • Switch to orange for rounds 7 through 9
  • Switch to yellow for rounds 10 through 12
  • Switch to green for rounds 13 through 15
  • Switch to blue for rounds 16 through 18
  • Switch to purple for earflaps and both edgings

Teen/Adult

  • Work rounds 1 through 8 in red
  • Switch to orange for rounds 9 through 11
  • Switch to yellow for rounds 12 through 14
  • Switch to green for rounds 15 through 17
  • Switch to blue for rounds 18 through 20
  • Switch to purple for earflaps and both edgings

Have a great week (make sure you get some time to have fun crocheting)! If you have any questions about this hat or anything at all, please don’t hesitate to email me at email hidden; JavaScript is required.

New Pattern Release and Giveaway: Big Button Flowers – Set 2 – CLOSED

It is finally ready – the pattern for my second set of Big Button Interchangeable Flowers! These are so much fun to whip up and add to a purse or jacket to bring some new life into something old. They are also great get-noticed flowers to add to a hat or headband. If you like these flowers, make sure you check out my first set of Big Button Flowers too! Both sets of flowers fit over a 1.5″ button, giving you 8 different options to accessorize.

To celebrate the new release, the Big Button Flower – Set 2 Pattern will be 30% off through April 6th, 2012, no promo code needed. In addition to the savings, three lucky winners will get this pattern free!

HOW TO ENTER:

There will be four chances to win this pattern! Leave a separate comment on this blog post below for each entry to get your four chances:

  1. Out of the either set of Big Button Interchangeable Flowers, which is your favorite?
  2. Like Micah Makes on Facebook (just post “AAF” in the comment section if you are already a fan).
  3. Share a link to this blog post on your Facebook page or blog; be sure to tag Micah Makes on FB or link to your blog.
  4. Subscribe to my newsletter (again,you can post if you are already signed up too).

Three winners will be chosen at random at midnight PST on Sunday April 1st, and will be announced Monday morning. Good luck and thanks for stopping by!

Crochet Bunny Hat Pattern

It is just two weeks until Easter, and we simply can’t let a holiday pass by without making a variation of my free Versatile Earflap Hat Pattern – a bunny, of course! This hat would be such a cute photo prop and fun addition to your holiday events. I know this little cutie liked it so much she wanted to wear her bunny hat the entire time we played on the playground.

You can find the basic instructions for the hat here. I made my hat completely in white. Then follow the directions below to make the ears.

Outer Ears (make 2)

0-3 Month and 3-6 Month Sizes

  • Row 1: Ch 6, sc in 2nd ch from hook and in each ch across; ch 1 and turn. (5)
  • Row 2-5: Sc in each st across; ch 1 and turn. (5)
  • Row 6: 2 Sc in first st, sc in next 3 sts, 2 sc in last st; ch 1 and turn. (7)
  • Row 7-10: Sc in each st across; ch 1 and turn. (7)
  • Row 11: 2 Sc in first st, sc in next 5 sts, 2 sc in last st; ch 1 and turn. (9)
  • Row 12: Sc in each st across; ch 1 and turn. (9)
  • Row 13: Sc2tog, sc in next 5 sts, sc2tog; ch1 and turn. (7)
  • Row 14: Sc2tog, sc in next 3 sts, sc2tog; ch1 and turn. (5)
  • Row 15: Sc2tog, sc in next st, sc2tog; fasten off and weave in loose ends. (3)
  • Attach same color yarn in same st as first chain. Ch 1, work (sc, ch 1, sc) in corner, sc across to other corner, work (sc, ch 1, sc), sc evenly around the remainder or the ear and join with a sl st in the first sc; fasten off, leaving a long tail for sewing.

6-12 Month and Toddler Sizes

  • Row 1: Ch 7, sc in 2nd ch from hook and in each ch across; ch 1 and turn. (6)
  • Row 2-7: Sc in each st across; ch 1 and turn. (6)
  • Row 8: 2 Sc in first st, sc in next 4 sts, 2 sc in last st; ch 1 and turn. (8)
  • Row 9-14: Sc in each st across; ch 1 and turn. (8)
  • Row 15: 2 Sc in first st, sc in next 6 sts, 2 sc in last st; ch 1 and turn. (10)
  • Row 16: Sc in each st across; ch 1 and turn. (10)
  • Row 17: Sc2tog, sc in next 6 sts, sc2tog; ch1 and turn. (8)
  • Row 18: Sc2tog, sc in next 4 sts, sc2tog; ch1 and turn. (6)
  • Row 19: Sc2tog, sc in next 2 sts, sc2tog; fasten off and weave in loose ends. (4)
  • Attach same color yarn in same st as first chain. Ch 1, work (sc, ch 1, sc) in corner, sc across to other corner, work (sc, ch 1, sc), sc evenly around the remainder or the ear and join with a sl st in the first sc; fasten off, leaving a long tail for sewing.

Child and Teen/Adult Sizes

  • Row 1: Ch 8, sc in 2nd ch from hook and in each ch across; ch 1 and turn. (7)
  • Row 2-9: Sc in each st across; ch 1 and turn. (7)
  • Row 10: 2 Sc in first st, sc in next 5 sts, 2 sc in last st; ch 1 and turn. (9)
  • Row 11-19: Sc in each st across; ch 1 and turn. (9)
  • Row 20: 2 Sc in first st, sc in next 7 sts, 2 sc in last st; ch 1 and turn. (11)
  • Row 21: Sc in each st across; ch 1 and turn. (11)
  • Row 22: Sc2tog, sc in next 7 sts, sc2tog; ch1 and turn. (9)
  • Row 23: Sc2tog, sc in next 5 sts, sc2tog; ch1 and turn. (7)
  • Row 24: Sc2tog, sc in next 3 sts, sc2tog; ch1 and turn. (5)
  • Row 25: Sc2tog, sc in next st, sc2tog; fasten off and weave in loose ends. (3)
  • Attach same color yarn in same st as first chain. Ch 1, work (sc, ch 1, sc) in corner, sc across to other corner, work (sc, ch 1, sc), sc evenly around the remainder or the ear and join with a sl st in the first sc; fasten off, leaving a long tail for sewing.
Inner Ears (make 2)

0-3 Month and 3-6 Month Sizes

  • Row 1: Ch 5, sc in 2nd ch from hook and in each ch across; ch 1 and turn. (4)
  • Row 2-5: Sc in each st across; ch 1 and turn. (4)
  • Row 6: 2 Sc in first st, sc in next 2 sts, 2 sc in last st; ch 1 and turn. (6)
  • Row 7-10: Sc in each st across; ch 1 and turn. (6)
  • Row 11: 2 Sc in first st, sc in next 4 sts, 2 sc in last st; ch 1 and turn. (8)
  • Row 12: Sc in each st across; ch 1 and turn. (8)
  • Row 13: Sc2tog, sc in next 4 sts, sc2tog; ch1 and turn. (6)
  • Row 14: Sc2tog, sc in next 2 sts, sc2tog; ch1 and turn. (4)
  • Row 15: Sc2tog twice; fasten off and weave in loose ends. (2)
  • Attach same color yarn in same st as first chain. Ch 1, work (sc, ch 1, sc) in corner, sc across to other corner, work (sc, ch 1, sc), sc evenly around the remainder or the ear and join with a sl st in the first sc; fasten off and weave in loose end.

6-12 Month and Toddler Sizes

  • Row 1: Ch 6, sc in 2nd ch from hook and in each ch across; ch 1 and turn. (5)
  • Row 2-7: Sc in each st across; ch 1 and turn. (5)
  • Row 8: 2 Sc in first st, sc in next 3 sts, 2 sc in last st; ch 1 and turn. (7)
  • Row 9-14: Sc in each st across; ch 1 and turn. (7)
  • Row 15: 2 Sc in first st, sc in next 5 sts, 2 sc in last st; ch 1 and turn. (9)
  • Row 16: Sc in each st across; ch 1 and turn. (9)
  • Row 17: Sc2tog, sc in next 5 sts, sc2tog; ch1 and turn. (7)
  • Row 18: Sc2tog, sc in next 3 sts, sc2tog; ch1 and turn. (5)
  • Row 19: Sc2tog, sc in next st, sc2tog; fasten off and weave in loose ends. (3)
  • Attach same color yarn in same st as first chain. Ch 1, work (sc, ch 1, sc) in corner, sc across to other corner, work (sc, ch 1, sc), sc evenly around the remainder or the ear and join with a sl st in the first sc; fasten off and weave in loose end.

Child and Teen/Adult Sizes

  • Row 1: Ch 7, sc in 2nd ch from hook and in each ch across; ch 1 and turn. (6)
  • Row 2-9: Sc in each st across; ch 1 and turn. (6)
  • Row 10: 2 Sc in first st, sc in next 4 sts, 2 sc in last st; ch 1 and turn. (8)
  • Row 11-19: Sc in each st across; ch 1 and turn. (8)
  • Row 20: 2 Sc in first st, sc in next 6 sts, 2 sc in last st; ch 1 and turn. (10)
  • Row 21: Sc in each st across; ch 1 and turn. (10)
  • Row 22: Sc2tog, sc in next 6 sts, sc2tog; ch1 and turn. (8)
  • Row 23: Sc2tog, sc in next 4 sts, sc2tog; ch1 and turn. (6)
  • Row 24: Sc2tog, sc in next 2 sts, sc2tog; ch1 and turn. (4)
  • Row 25: Sc2tog twice; fasten off and weave in loose ends. (2)
  • Attach same color yarn in same st as first chain. Ch 1, work (sc, ch 1, sc) in corner, sc across to other corner, work (sc, ch 1, sc), sc evenly around the remainder or the ear and join with a sl st in the first sc; fasten off and weave in loose end.
Finishing

When you have all of you ear pieces made, line up the straight sides of one outer ear and one inner ear and place them wrong sides together (wrong side will be the back of your final round). Using the long tail from your outer ear, sew the two pieces together just through the backs of the stitches all the way around. Pinch the ear in half at the bottom across the straight edge. Sew along the edge to hold it in place and then sew the ear to the hat. Repeat with the other pieces. Lastly, I finished my hat off with braids of pastel colors on the earflaps.

Thanks so much for stopping by! If you have any questions, please feel free to leave a comment or email me at email hidden; JavaScript is required.

Colorblock Hat: Irish Edition

Happy St. Patrick’s Day! We have our green on today, do you? Although the weather will be too nice for earflap hats, I still made a variation of my free Versatile Earflap Hat Pattern inspired by the Irish flag. I know quite a few people who would love to wear this hat all year long!

To make one of your own, simply download the base pattern here, and then take note of where to change colors for the size you are making below. I finished my hats off with braids of green, white and orange.

0-3 Months

  • Work rounds 1 through 7 in green
  • Switch to white for rounds 8 through 10
  • Switch to orange for round 11, earflaps and both edgings

3-6 Months

  • Work rounds 1 through 8 in green
  • Switch to white for rounds 9 through 11
  • Switch to orange for round 12, earflaps and both edgings

6-12 Months

  • Work rounds 1 through 8 in green
  • Switch to white for rounds 9 through 12
  • Switch to orange for round 13, earflaps and both edgings

Toddler

  • Work rounds 1 through 9 in green
  • Switch to white for rounds 10 through 13
  • Switch to orange for rounds 14 & 15, earflaps and both edgings

Child

  • Work rounds 1 through 11 in green
  • Switch to white for rounds 12 through 16
  • Switch to orange for rounds 17 & 18, earflaps and both edgings

Teen/Adult

  • Work rounds 1 through 12 in green
  • Switch to white for rounds 13 through 18
  • Switch to orange for rounds 19 & 20, earflaps and both edgings

Have a great week and if you have any questions at all, don’t hesitate to email me at email hidden; JavaScript is required.