
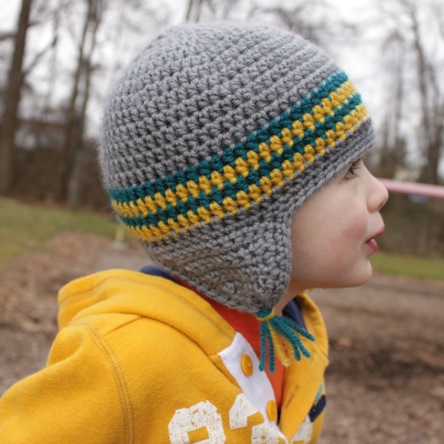
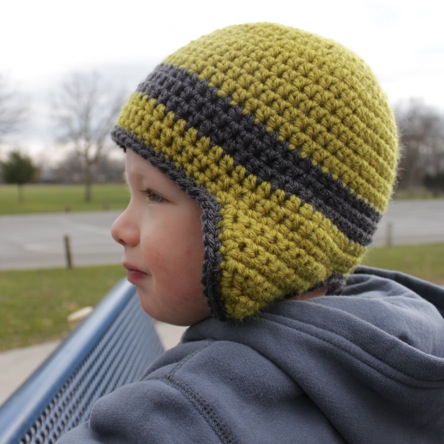
Here is an easy pattern for a versatile earflap hat. The best part – it’s free! It is made with #4 Worsted/Aran weight yarn and the pattern includes sizes for newborn through adult. There are so many different things you can do with this pattern, and I’m planning on sharing many ideas throughout the year so stay tuned.
If you like this pattern, sign up for my free monthly newsletter to be notified of other free pattern releases.
Hat Pictures
-

-

-

-


Thank you for the wonderful new pattern! I LOVE all your patterns…they always turn out so cute!!! Happy New Year! :0)
Thank you, Rita! 🙂
Thank you so much for the free pattern!!
Thank you for the free pattern, I can’t wait to get started.
You’re welcome! I hope you will enjoy it!!
First Thank you so much for your pattern!!! 🙂
I m doing this hat for my twin nephews and wonder if i should do the toddler or child version.They will be 3 on August.
Thank you ,and sorry for my english im from Argentina.
Have a great day 🙂
Hi Sol! You are welcome for the pattern – I’m so glad you like it!! I would recommend you make the child size for your nephews. I recommend that size for most 3-9 year olds. Plus, you can be sure the hats will fit them for quite some time. 🙂
Hi Micah!!
Thank you so much for yor answer. I started making the child size , i’ll let you know how it goes.
Once again thank you for your pattern, and congratulations for having such a beautiful blog!!!
🙂
Hi! how do I do to download this pattern? I can`t!! Thanks, your work is lovely 😀
I just emailed it to the address you left on the comment form. Hope you’ll enjoy it!
Could you please send ‘crochet football’ pattern again? Something happened and I can’t download it. Thanks. D
I just emailed it to you 🙂
Hi,
I love this pattern! I have a quick question though. I cannot make my seem look good! I’ve tried joining to the top of the chain 2, joining to the first hdc, joining to the middle of the chain 2, even doing the first hdc as a dc in each round, but my seem still looks terrible. I’m sure it’s something i’m doing, but I’d love to hear how exactly you join your rounds, and possible see a photo of the back of one of your hats? Thanks so much!
*seam, sorry. Also, I’ve tried using just the front, or just the back loops of the chain 2.
Hi Kami! I join through one loop in the 2nd chain of the ch 2. I think joining seams always look noticeable and I usually design my patterns without joining whenever possible. However, I wanted to keep this pattern “versatile” and the joins are necessary if you want to change colors to make stripes. I will send a picture to your email address later today so you can see what my hats look like and compare it to yours. Thanks!
Hi Micah,
I LOVE your pattern, could I please ask for a picture of the back of one of your hats as well. I’ve made a few with a few joining techniques and can’t seem to find the one I think looks the best. I also have a terrible time trying to keep the seam straight as I go through the rounds. Thanks in advance for the help, I really appreciate it! 😉
Hi Carrie! The seam won’t stay straight – that is perfectly normal. I am sending you a picture now 🙂
I was wondering about the seem also. Could you send me a picture also. I think I did something wrong when I did my second ear flap I think because me seem is in the front of the hat. Any tips!!! Thank you for the free patterns!!!
You can check out the pictures here. Hope it helps!
This pattern is gorgeous. I am in love with it! I want to make dozens. Thank you so much.
Thank you, Shawna! 🙂
I’m trying to make this hat and I can’t seem to find where it says what size hook to use for newborn size. I might just be blind though
It’s listed in the supplies list – an I (5.50mm) hook.
I subscribed to the newsletter as it prompted me to do for the multi-size earflap hat pattern….and when i push the download button nothing happens i also already confirmed the subscription…. ;(
Hi Diana! I just had the pattern sent to the address you left on the comment form. If you have additional problems downloading the pattern, just let me know and I’ll be sure you get it. Also, it is not required to subscribe to the newsletter in order to download the free patterns. I definitely only want people subscribed who want to receive the newsletter and I will never share or sell your email address. You can unsubscribe at any time by contacting me or by clicking the “unsubscribe” link included on every newsletter. I hope you will enjoy the pattern!
Sorry I cannot open your football pattern. Please tell me how .
Hi Joan, If you click on the green download button on this page and enter your email address, the pattern will be emailed to you (then you will need to access the football post to see where to change colors). Let me know if you have any problems. Thanks.
I love all your patterns! I hope it is ok that I recommend this as my go to beanie/earflap pattern. The first time I used it was for the Thing 1 & Thing 2 hats that you posted on Dr. Seuss’s birthday. Excellent design and very well-written. Thank you.
Thank you so much, Nichole! I’m so glad you like it and that you recommend it!!
Thank you for the free pattern! Yours was the cutest I found and I can’t wait to start this for my new grandson!
Thanks, Sandy and congrats on the new grandson!
Thanks for your patterns! I know how hard it is to make patterns, as I’ve done some myself! Thanks for making it easier for me. I’ve made a newborn skunk hat for my soon to be here grandson, and another for a 3 year old boy. I love the apple hat, and will be making that soon also! Thanks again.
Thanks, Linda! Congrats on the soon to be here grandson – I bet he will be adorable in his skunk hat!!
Thank you very much for your pattern. I love it. The pattern is very clear, easy and works up fast. I am on my second hat with this pattern for my girls and have plans for more.
Thanks again!
So glad you like it, Holly. Thanks 🙂
Hi,
I’m making a hat for my baby and now that i’m near the end, I am confused. First, I now have a ridge at the back of the hat b/c I slip stitched over to make the first ear flap, but then counted over & attached the yarn for the second ear flap. So, there is a ridge where I slip stitched on only one side. Second, I’m assuming the seam should be the back of the hat, but in order to cover my daughter’s ears, that side needs to be the front of the hat. Since the ear flaps are positioned more toward the front of the hat, I had to turn it around to work… other ear flap patterns I’ve seen position the ear flaps closer to the back…
Did I do something wrong? Help please!
Uh, okay, I just realized I have a ridge b/c I did a single crochet instead of slip stitch.
But, I’m still not getting the ear flap placement right… Where exactly am I counting the 26 stitches from for the second flap? I tried counting from the center back and from the ear flap around the back. I even tried attaching at the center back and just sl st 11 across the opposite direction, but the flaps seem to always be too far forward. (I’m making the toddler size).
Hi Stephanie! Like the pattern says, hold the hat upside down with the first earflap on the left. Count from the edge (closest to the seam) of that first earflap 26 stitches to the right. Attach the yarn and sc in that st and then work back toward the seam (to the left) sc’ing in next 9 sts. I think you are probably attaching the yarn and working that first row on the inside (wrong side) of the hat instead of the outside. That would cause the placement to be off. Does that make sense? Also, overall the seam curve is centered in the back, but the place where it meets the edge of the hat is not in the center of the earflap placement so counting 11 in the opposite direction wouldn’t work out either. Let me know if you have additional questions. Thanks!
Love your pattern!! I am having problems with the size of the adult hat. I either crochet differently or we have big heads at our house! 🙂 What would you suggest to increasing the width of the hat a bit? I don’t want to ruin the integrity of the pattern by messing with it too much. Bigger hook? More increases? Thanks, Cori
Hi Cori – When folded flat, does your hat measure about 10.5 inches at the bottom edge above the earflaps? If so, it should fit a head circumference of up to 22.5-23 inches. It is entirely possible that your heads could measure larger than this and if so, I would suggest more increases. If your hat doesn’t measure 10.5 inches across, I would suggest a bigger hook. Another consideration could also be the yarn you are using. There is quite a big difference among yarn labeled #4 worsted. I use a heavy worsted (aka Afghan or Aran yarn) like Vanna’s Choice or something similar. You may have trouble with the gauge if you are using a lighter worsted. Let me know if you have any additional questions.
Your hats are so cute! I’d like to make your earflap hat, but I can’t download it. I just get the cart. I ‘ve never made a hat and I’d like to try this for my grandson. Thanks for sharing!
I emailed it to you, Bett. Check your junk/spam folder if it isn’t in your inbox. Happy crocheting!
hi,
i just love this hat, but i can not dowload it. perhaps you can email it to mail.
thanks.
grz lena
I just emailed it to you 🙂 Happy crocheting!
Thank you for the pattern. I am making the football hat and this is my first real project. I was doing great until I got to row 8 where I counted the stitches and then had a big gap to close. I just skipped over the stitches and sliped into the top of ch 2 to try to close the gap. i did the same thing on the following rows, but now Im ending up with big holes in my hat. Do you know what I am doing wrong. I am really a beginner!
Hi Melissa! I’m not sure if this is something that would clear up with more practice/experience or if there is something that you are actually doing incorrectly. Do you think you could send me a photo of the back of your hat to email hidden; JavaScript is required? Maybe I can offer some better advice upon seeing it.
last night i pulled out all my rows after row 7. (I am making the toddler size). Do you have a picture of the back of one of your hats? I read through your comments and lots of people talked about the seam. Do they mean for the earflaps or is there a seam down the back of the hat? maybe that is where I am confused. It looked really good when I just had a flat circle. I think I just dont know what to do with the extra stiches that change it to a hat shape. Does that make sense? If there are any pictures that you could send me that would be great. Thank you really for your help.
No problem, Melissa. I just emailed you a couple pictures of the back of my hats. The “seam” is where you join the rounds and it will appear on the back of the hat. You can see it in the pictures I sent. Hope they help!
I am new to crocheting (i usually knit!) so I apologize if this is a dumb question. Why on the first ear flap do you sl st and THEN begin the ear flap? I’m unsure if I’m doing something wrong but it leaves a little line of stitches off to the side. Am I doing something wrong? Is it suppose to do that?
Otherwise the pattern was very easy and I love it! It’s so quick to crochet up. Working on a bear ear hat and when I finish this I am going to do your adorable apple hat! It is too cute!
The sl sts are just to position the earflap in the right position without breaking your yarn. They shouldn’t be too noticeable since you then crochet over them on the edging. If you would rather, you could always break the yarn (or work from the other end of the skein), count over to where you would sl st to, attach yarn in that st and then continue with the pattern instructions.
Okay I understand now! I’ll just do the edging over it hehe. Thank you so much!
Micah bonjour !
je viens de parcourir votre blog et je l’ai trouvé merveilleux !
j’ai voulu prendre ce modele en téléchargement gratuit et n’y suis pas arrivée !
pourriez vous avoir la gentillesse de me dire ce que je dois faire ?
ou me l’envoyé par mail ?
j’attends avec impatience de vos nouvelles ! je suis française et ne maitrise pas l’anglais !!!
merci mes 7 petits enfants seraient bien contents ! vous faites des choses magnifiques !
bon dimanche !
Hi There 🙂
I started this hat (THANK YOU for the free download!!), and now have a couple of questions before continuing. I hope I’m able to make them clear enough 🙂
I’m making the child size.
First, when I join “in top of ch 2,” do I just join through the middle of the whole chain?
Also, in rows 1-7, after ch 2, it says to hdc in same st. Then, starting at round 8, it doesn’t say that anymore. If i skip that st though, it leaves a bigger hole. Should I continue to do my first hdc in the same st? Sorry, don’t know if this makes any sense…
Thanks so much,
Lisa
Hi Lisa,
When joining in the “top of the ch 2,” you want to join through one of the three loops in the 2nd chain of the ch 2. Does that make sense?
Starting at round 8, you do not hdc in the same st as the ch 2. It may seem like that leaves a bigger hole, but I think the more rounds you do, you won’t even notice that hole. Plus the more you crochet (practice makes perfect) that will get better. If you do hdc in that same stitch, you will end up increasing the number of stitches in each round and your hat will not fit properly.
Let me know if you have any other questions.
Thank you so much! I think when I go back and join differently (yes, that makes sense :)), it will also close that hole more. I did a few more rows and did notice that I was increasing on the side of the join; I’ll take out those rows and try again.
I really appreciate your response!
~Lisa
Hi,
First off I just want to say we have the same name…pretty cool. I have a question about the ear flaps. I have finished the first ear flap for an adult size, the ear flap seems small. It makes the hat look like an old football helmet. I’m not sure if I messed something (I did follow the pattern exact) or if I should add a few rows to it and maybe make it wider? I have not done the edging yet, so I’m not sure if that will solve the problem?
Thanks so much,
Micah
Hi Micah!! Awesome name! The edgings will make the earflap wider by about an inch and longer by a half inch (the hat itself will be a half inch longer too). If that is still going to make the earflaps smaller than you prefer, definitely go back and add more rows and width. Let me know if you have any other questions. Thanks!
Thank you so much for this pattern. I am on my way to the store to get all the materials to make 30 of these hats Dr Seuss Style to put in the gift bags for the kids at my grand children’s school for the readathon. Keep you finger crossed for me, I know this is very ambitious. Very cute pattern, Thanks again
Wow! Extremely ambitious…but what a nice gift?!! Good luck! 🙂