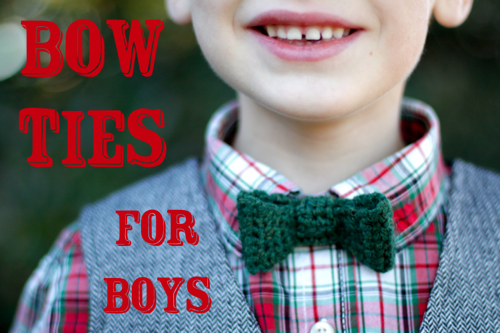
Happy Mother’s Day!

Wow! I can’t believe it has been nearly a month since I posted here. Being a mom sure has you going in a million directions all at once!

I just wanted to pop in today to say that even though it has been quiet around here lately, I have still been working on more fun stuff to share with you. In the meantime, I am offering 30% off any purchase from my pattern store today only, no coupon code required. Happy Mother’s Day!

Crochet Watermelon Hat

Here is a fun variation on my Versatile Earflap Hat Pattern for summer – a Watermelon Hat. I’m in one of those phases in my life where it seems like everyone I know is having a baby, and this hat will make such a cute little photo prop for those summer newborns.

The variation for this hat is really simple and will be the same for all sizes. You can download the free pattern for the basic hat here, and then read on for instructions to change the basic hat into a watermelon hat.

Begin by crocheting the hat in either pink or red from the first round all the way to the next-to-last round (example: rounds 1-10 on the 0-3 month size). Change to white for the last round, and then work the earflaps and both edgings in green. Finish the hat off by stitching “seeds” all over, and adding either braids, pom poms or tassels to the earflaps. I made this hat in Vanna’s Choice Yarn in Rose, White, Kelly Green and Espresso.

Thanks for stopping by and have a great week!

Big Button Flowers – Set 2 Pattern Winners Announced

Thank you everyone for entering to win my latest pattern, Big Button Interchangeable Flowers – Set 2! I really appreciate you all being fans on Facebook, subscribing to my newsletter and sharing the giveaway. Don’t forget that this pattern will be 30% off through April 6th in the pattern store (just in case you didn’t win and are looking for a deal)!

And the winners are….


Crochet Rainbow Hat Pattern

This week’s hat variation is super fun and I am so excited to share it! I have really enjoyed coming up with different variations of my free Versatile Earflap Hat Pattern and I hope you have enjoyed them too.

The idea for this rainbow hat actually came to me when I was thinking of St. Patrick’s Day hat ideas, but I wish I would have thought of it way back in December for my rainbow-loving niece’s Christmas present. My favorite part – the fluffy cloud pom poms on the earflaps.

To make this hat, follow the instructions in my free hat pattern available for download here, changing colors as noted below. Finish it off by adding a pom pom to each earflap. Want those clouds extra puffy? All you need to do is brush your pom pom out with a wire brush (like a clean, new pet brush) and then trim it into shape.

0-3 Months

  • Work rounds 1 through 3 in red
  • Switch to orange for rounds 4 & 5
  • Switch to yellow for rounds 6 & 7
  • Switch to green for rounds 8 & 9
  • Switch to blue for rounds 10 & 11
  • Switch to purple for earflaps and both edgings

3-6 Months

  • Work rounds 1 through 4 in red
  • Switch to orange for rounds 5 & 6
  • Switch to yellow for rounds 7 & 8
  • Switch to green for rounds 9 & 10
  • Switch to blue for rounds 11 & 12
  • Switch to purple for earflaps and both edgings

6-12 Months

  • Work rounds 1 through 5 in red
  • Switch to orange for rounds 6 & 7
  • Switch to yellow for rounds 8 & 9
  • Switch to green for rounds 10 & 11
  • Switch to blue for rounds 12 & 13
  • Switch to purple for earflaps and both edgings

Toddler

  • Work rounds 1 through 7 in red
  • Switch to orange for rounds 8 & 9
  • Switch to yellow for rounds 10 & 11
  • Switch to green for rounds 12 & 13
  • Switch to blue for rounds 14 & 15
  • Switch to purple for earflaps and both edgings

Child

  • Work rounds 1 through 6 in red
  • Switch to orange for rounds 7 through 9
  • Switch to yellow for rounds 10 through 12
  • Switch to green for rounds 13 through 15
  • Switch to blue for rounds 16 through 18
  • Switch to purple for earflaps and both edgings

Teen/Adult

  • Work rounds 1 through 8 in red
  • Switch to orange for rounds 9 through 11
  • Switch to yellow for rounds 12 through 14
  • Switch to green for rounds 15 through 17
  • Switch to blue for rounds 18 through 20
  • Switch to purple for earflaps and both edgings

Have a great week (make sure you get some time to have fun crocheting)! If you have any questions about this hat or anything at all, please don’t hesitate to email me at email hidden; JavaScript is required.

New Pattern Release and Giveaway: Big Button Flowers – Set 2 – CLOSED

It is finally ready – the pattern for my second set of Big Button Interchangeable Flowers! These are so much fun to whip up and add to a purse or jacket to bring some new life into something old. They are also great get-noticed flowers to add to a hat or headband. If you like these flowers, make sure you check out my first set of Big Button Flowers too! Both sets of flowers fit over a 1.5″ button, giving you 8 different options to accessorize.

To celebrate the new release, the Big Button Flower – Set 2 Pattern will be 30% off through April 6th, 2012, no promo code needed. In addition to the savings, three lucky winners will get this pattern free!

HOW TO ENTER:

There will be four chances to win this pattern! Leave a separate comment on this blog post below for each entry to get your four chances:

  1. Out of the either set of Big Button Interchangeable Flowers, which is your favorite?
  2. Like Micah Makes on Facebook (just post “AAF” in the comment section if you are already a fan).
  3. Share a link to this blog post on your Facebook page or blog; be sure to tag Micah Makes on FB or link to your blog.
  4. Subscribe to my newsletter (again,you can post if you are already signed up too).

Three winners will be chosen at random at midnight PST on Sunday April 1st, and will be announced Monday morning. Good luck and thanks for stopping by!

Crochet Bunny Hat Pattern

It is just two weeks until Easter, and we simply can’t let a holiday pass by without making a variation of my free Versatile Earflap Hat Pattern - a bunny, of course! This hat would be such a cute photo prop and fun addition to your holiday events. I know this little cutie liked it so much she wanted to wear her bunny hat the entire time we played on the playground.

You can find the basic instructions for the hat here. I made my hat completely in white. Then follow the directions below to make the ears.

Outer Ears (make 2)

0-3 Month and 3-6 Month Sizes

  • Row 1: Ch 6, sc in 2nd ch from hook and in each ch across; ch 1 and turn. (5)
  • Row 2-5: Sc in each st across; ch 1 and turn. (5)
  • Row 6: 2 Sc in first st, sc in next 3 sts, 2 sc in last st; ch 1 and turn. (7)
  • Row 7-10: Sc in each st across; ch 1 and turn. (7)
  • Row 11: 2 Sc in first st, sc in next 5 sts, 2 sc in last st; ch 1 and turn. (9)
  • Row 12: Sc in each st across; ch 1 and turn. (9)
  • Row 13: Sc2tog, sc in next 5 sts, sc2tog; ch1 and turn. (7)
  • Row 14: Sc2tog, sc in next 3 sts, sc2tog; ch1 and turn. (5)
  • Row 15: Sc2tog, sc in next st, sc2tog; fasten off and weave in loose ends. (3)
  • Attach same color yarn in same st as first chain. Ch 1, work (sc, ch 1, sc) in corner, sc across to other corner, work (sc, ch 1, sc), sc evenly around the remainder or the ear and join with a sl st in the first sc; fasten off, leaving a long tail for sewing.

6-12 Month and Toddler Sizes

  • Row 1: Ch 7, sc in 2nd ch from hook and in each ch across; ch 1 and turn. (6)
  • Row 2-7: Sc in each st across; ch 1 and turn. (6)
  • Row 8: 2 Sc in first st, sc in next 4 sts, 2 sc in last st; ch 1 and turn. (8)
  • Row 9-14: Sc in each st across; ch 1 and turn. (8)
  • Row 15: 2 Sc in first st, sc in next 6 sts, 2 sc in last st; ch 1 and turn. (10)
  • Row 16: Sc in each st across; ch 1 and turn. (10)
  • Row 17: Sc2tog, sc in next 6 sts, sc2tog; ch1 and turn. (8)
  • Row 18: Sc2tog, sc in next 4 sts, sc2tog; ch1 and turn. (6)
  • Row 19: Sc2tog, sc in next 2 sts, sc2tog; fasten off and weave in loose ends. (4)
  • Attach same color yarn in same st as first chain. Ch 1, work (sc, ch 1, sc) in corner, sc across to other corner, work (sc, ch 1, sc), sc evenly around the remainder or the ear and join with a sl st in the first sc; fasten off, leaving a long tail for sewing.

Child and Teen/Adult Sizes

  • Row 1: Ch 8, sc in 2nd ch from hook and in each ch across; ch 1 and turn. (7)
  • Row 2-9: Sc in each st across; ch 1 and turn. (7)
  • Row 10: 2 Sc in first st, sc in next 5 sts, 2 sc in last st; ch 1 and turn. (9)
  • Row 11-19: Sc in each st across; ch 1 and turn. (9)
  • Row 20: 2 Sc in first st, sc in next 7 sts, 2 sc in last st; ch 1 and turn. (11)
  • Row 21: Sc in each st across; ch 1 and turn. (11)
  • Row 22: Sc2tog, sc in next 7 sts, sc2tog; ch1 and turn. (9)
  • Row 23: Sc2tog, sc in next 5 sts, sc2tog; ch1 and turn. (7)
  • Row 24: Sc2tog, sc in next 3 sts, sc2tog; ch1 and turn. (5)
  • Row 25: Sc2tog, sc in next st, sc2tog; fasten off and weave in loose ends. (3)
  • Attach same color yarn in same st as first chain. Ch 1, work (sc, ch 1, sc) in corner, sc across to other corner, work (sc, ch 1, sc), sc evenly around the remainder or the ear and join with a sl st in the first sc; fasten off, leaving a long tail for sewing.
Inner Ears (make 2)

0-3 Month and 3-6 Month Sizes

  • Row 1: Ch 5, sc in 2nd ch from hook and in each ch across; ch 1 and turn. (4)
  • Row 2-5: Sc in each st across; ch 1 and turn. (4)
  • Row 6: 2 Sc in first st, sc in next 2 sts, 2 sc in last st; ch 1 and turn. (6)
  • Row 7-10: Sc in each st across; ch 1 and turn. (6)
  • Row 11: 2 Sc in first st, sc in next 4 sts, 2 sc in last st; ch 1 and turn. (8)
  • Row 12: Sc in each st across; ch 1 and turn. (8)
  • Row 13: Sc2tog, sc in next 4 sts, sc2tog; ch1 and turn. (6)
  • Row 14: Sc2tog, sc in next 2 sts, sc2tog; ch1 and turn. (4)
  • Row 15: Sc2tog twice; fasten off and weave in loose ends. (2)
  • Attach same color yarn in same st as first chain. Ch 1, work (sc, ch 1, sc) in corner, sc across to other corner, work (sc, ch 1, sc), sc evenly around the remainder or the ear and join with a sl st in the first sc; fasten off and weave in loose end.

6-12 Month and Toddler Sizes

  • Row 1: Ch 6, sc in 2nd ch from hook and in each ch across; ch 1 and turn. (5)
  • Row 2-7: Sc in each st across; ch 1 and turn. (5)
  • Row 8: 2 Sc in first st, sc in next 3 sts, 2 sc in last st; ch 1 and turn. (7)
  • Row 9-14: Sc in each st across; ch 1 and turn. (7)
  • Row 15: 2 Sc in first st, sc in next 5 sts, 2 sc in last st; ch 1 and turn. (9)
  • Row 16: Sc in each st across; ch 1 and turn. (9)
  • Row 17: Sc2tog, sc in next 5 sts, sc2tog; ch1 and turn. (7)
  • Row 18: Sc2tog, sc in next 3 sts, sc2tog; ch1 and turn. (5)
  • Row 19: Sc2tog, sc in next st, sc2tog; fasten off and weave in loose ends. (3)
  • Attach same color yarn in same st as first chain. Ch 1, work (sc, ch 1, sc) in corner, sc across to other corner, work (sc, ch 1, sc), sc evenly around the remainder or the ear and join with a sl st in the first sc; fasten off and weave in loose end.

Child and Teen/Adult Sizes

  • Row 1: Ch 7, sc in 2nd ch from hook and in each ch across; ch 1 and turn. (6)
  • Row 2-9: Sc in each st across; ch 1 and turn. (6)
  • Row 10: 2 Sc in first st, sc in next 4 sts, 2 sc in last st; ch 1 and turn. (8)
  • Row 11-19: Sc in each st across; ch 1 and turn. (8)
  • Row 20: 2 Sc in first st, sc in next 6 sts, 2 sc in last st; ch 1 and turn. (10)
  • Row 21: Sc in each st across; ch 1 and turn. (10)
  • Row 22: Sc2tog, sc in next 6 sts, sc2tog; ch1 and turn. (8)
  • Row 23: Sc2tog, sc in next 4 sts, sc2tog; ch1 and turn. (6)
  • Row 24: Sc2tog, sc in next 2 sts, sc2tog; ch1 and turn. (4)
  • Row 25: Sc2tog twice; fasten off and weave in loose ends. (2)
  • Attach same color yarn in same st as first chain. Ch 1, work (sc, ch 1, sc) in corner, sc across to other corner, work (sc, ch 1, sc), sc evenly around the remainder or the ear and join with a sl st in the first sc; fasten off and weave in loose end.
Finishing

When you have all of you ear pieces made, line up the straight sides of one outer ear and one inner ear and place them wrong sides together (wrong side will be the back of your final round). Using the long tail from your outer ear, sew the two pieces together just through the backs of the stitches all the way around. Pinch the ear in half at the bottom across the straight edge. Sew along the edge to hold it in place and then sew the ear to the hat. Repeat with the other pieces. Lastly, I finished my hat off with braids of pastel colors on the earflaps.

Thanks so much for stopping by! If you have any questions, please feel free to leave a comment or email me at email hidden; JavaScript is required.