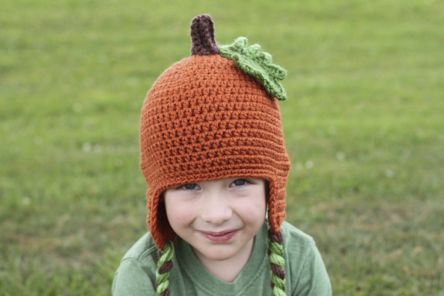
Temperatures are starting to drop here in Pennsylvania and I can’t wait to bust out the hats! Here is another fun free pattern to keep your autumn festive. Follow the directions in my Versatile Earflap Hat Pattern available for download here to make this pumpkin hat.
Start by crocheting the entire hat and both edgings in your favorite shade of orange. The instructions for the stem, leaf and vine are listed below. The leaf is a little tricky, but take your time following the directions and you can do it!
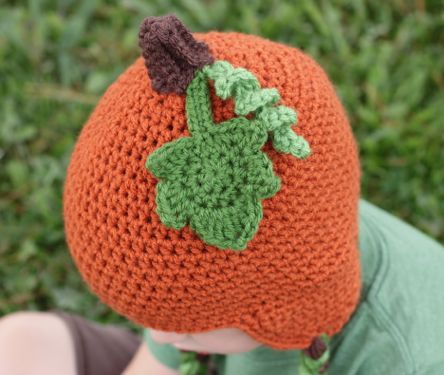
Leaf
- Round 1: Work in continuous rounds – do not join unless stated. Using green yarn and an H hook, 8 hdc  in a magic circle. (8)
- Round 2: 2 Hdc in ea st around. (16) Skip next st and sl st in the next st.
- Round 3: * (Sc, hdc, dc) in next st, dc in next st, ch 1, sl st in ch, ch 3, sl st in same st * repeat one more time; (sc,hdc) in next st, (2 htr, tr) in next st, ch 1, sl st in ch, (tr, 2 htr) in next st, (hdc, sc) in next st; * sl st in next st, ch 4, sl st in 1st ch from hook, dc in same st, (dc, hdc, sc) in next st * repeat one more time; sl st in next 2 sts, ch 8, sc in 2nd ch from hook and next 6 chains, sl st in next st; fasten off and weave in ends.
Vine
- With another shade of green and a H hook, ch 15. 3 Sc in the 2nd ch from hook and in each ch across. (42) Fasten off and use the loose ends to attach the vine to the top of the hat.
Stem
- Row 1: Using brown yarn and an H hook, ch 8 leaving a long tail for sewing. Sc in 2nd ch from hook and in each ch across; ch 1 and turn. (7)
- Row 2-9: Sc in BLO (back loop only) of each st across; ch 1 and turn. (7)
- Row 10: Line up row 1 and row 9 forming a tube. Work sc through both row 1 and 9 across. (7) Fasten off leaving a long tail for sewing.
- Use the first tail to sew the top of the stem closed. Weave in that end. Next, stretch out the base of the stem and sew it to top of the hat using the other yarn end. As you are sewing the stem in place, make sure to sew it over the vine and leaf stem to hold those in place. When you stretch and sew the stem on, the ribs on the stem have a tendency to swirl, giving it a more authentic look. Finish your hat with braids on the earflaps or whatever you like.
I hope you love this pattern as much as I do! If you have any questions, please feel free to email me at email hidden; JavaScript is required. Looking for other free and fun fall patterns? Check out my Candy Corn Colorblock Hat, Apple Hat, Football Hat and Football Applique Hat.


