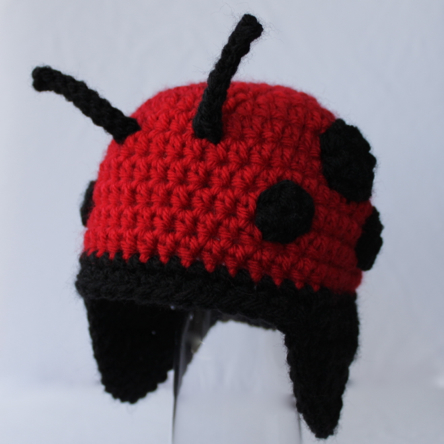
For more summer fun, I made a ladybug hat to share with you this week using my free Versatile Earflap Hat Pattern. I only had time to make a newborn size, but I think that is pretty appropriate considering they are the only ones who would possibly be wearing earflap hats this time of year. Needless to say, I didn’t have a model for newborn size, but I think you’ll agree it would look pretty darn cute!
This hat is super simple to make, and it is easy to modify the pattern to change it into a ladybug. The modifications are the same for all sizes. If you haven’t downloaded the pattern yet, you can do it here, and then just make the following changes:
- Work all rounds in red (I used Vanna’s Choice in Scarlet – a little brighter than my favorite red, Cranberry, from that line – just perfect for a ladybug).
- Work both earflaps and both edgings in black.
- Add spots. For this hat I made four circles of 6 sc in a magic circle, two circles of 7 hdc in a magic circle and two circles or 8 dc in a magic circle. If you like the look of these spots and need help making a magic circle, check out this post. I’m not terribly happy with my spots, for as much as I tried to sew them flat, I think they are too puffy. Next time I will opt for cutting circles from felt and sewing those to the hat instead (which will be much easier anyway).
- For each antenna, I made a chain of 9, slip stitched in the second chain from the hook and in each chain across. Then I fastened off and attached the antennae with the loose ends.
- You can finish off your hat by adding braids, tassels or pom poms to the center of each earflap if you like. Or you can just leave them plain. I haven’t decided what to do yet. What would you choose?
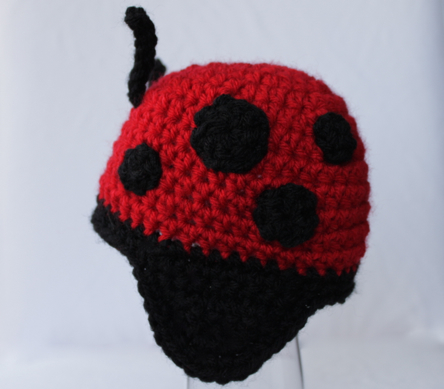
I hope you have enjoyed this hat. If you really love ladybugs, be sure to check out the Ladybug Hat (with convertible earflaps) in my pattern store – it is a lot of fun! Thanks for stopping by and have a great week!!










Hi Micah,
Thanks for sharing this wonderful pattern! I’ve question about the edging & earflap. Do you do the edging first then attach both earflaps? From your photos, I see there are two rows in black connect to the hat. My finished earflaps do not look like earflap at all…is more square-like than curve on the edge. I’m appreciate your suggestion!
Thank you
Peggy
Hi Peggy! The earflaps are made first, then the first and second edgings go around the bottom edge of the hat, including the earflaps. Does that make sense? I’m not sure why your earflaps would turn out square-like, but working the edgings around them should help smooth those out. Let me know if you have any other questions.
Yes, it makes sense! Thanks! I’ve one more question about the joining of the hat. Are those stitches supposed lining up in a straight line or kind of shifting every round? Do you mind sending me a photo of the finished work?
Thank you very much!
I just emailed you 🙂
This is such a cute pattern, I have added a link to it on http://www.crochetatplay.com
It will show up in our recently added section tonight at midnight, I hope it brings you lots of views.
If you have other patterns you would like to add, you can submit them right from the website.
We currently have 22,000 free pattern links and are growing every day
Thanks so much 🙂