Big Button Flowers – Set 2 Pattern Winners Announced

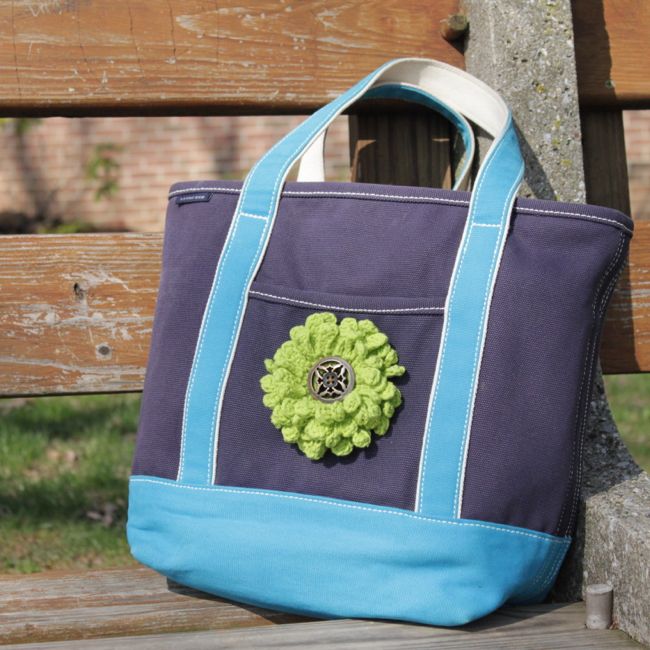
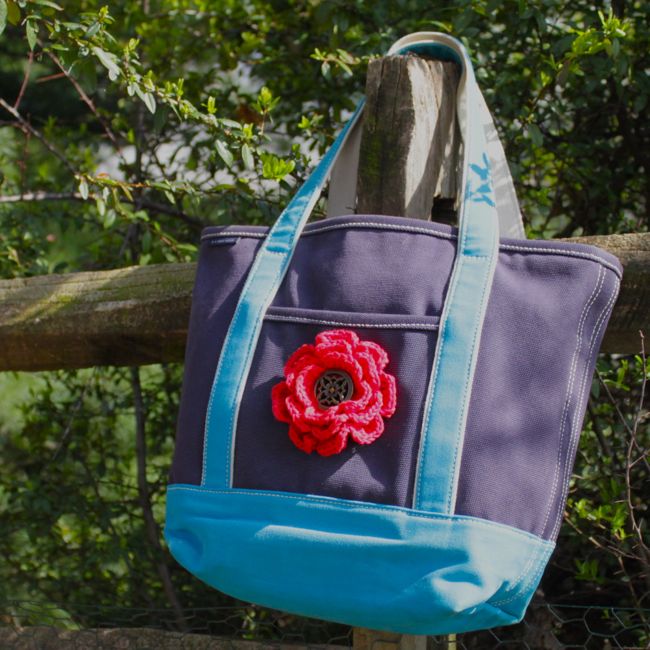
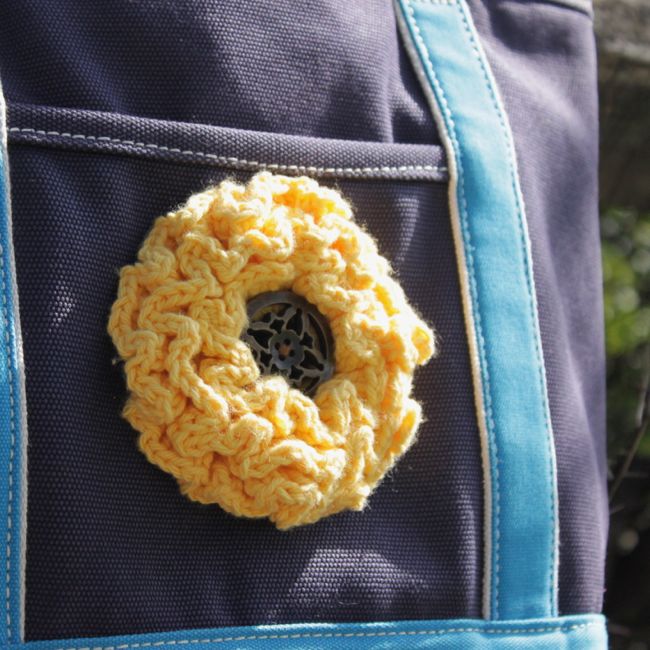
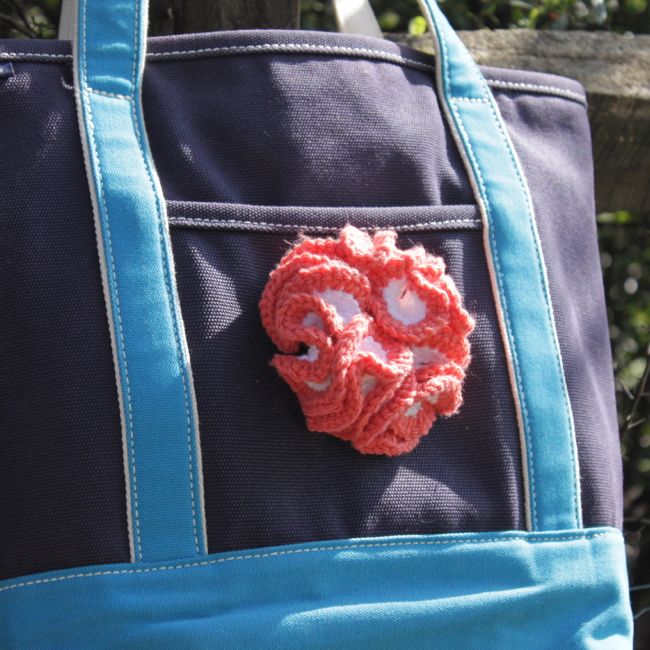
Thank you everyone for entering to win my latest pattern, Big Button Interchangeable Flowers – Set 2! I really appreciate you all being fans on Facebook, subscribing to my newsletter and sharing the giveaway. Don’t forget that this pattern will be 30% off through April 6th in the pattern store (just in case you didn’t win and are looking for a deal)!

And the winners are….


Crochet Rainbow Hat Pattern

This week’s hat variation is super fun and I am so excited to share it! I have really enjoyed coming up with different variations of my free Versatile Earflap Hat Pattern and I hope you have enjoyed them too.

The idea for this rainbow hat actually came to me when I was thinking of St. Patrick’s Day hat ideas, but I wish I would have thought of it way back in December for my rainbow-loving niece’s Christmas present. My favorite part – the fluffy cloud pom poms on the earflaps.

To make this hat, follow the instructions in my free hat pattern available for download here, changing colors as noted below. Finish it off by adding a pom pom to each earflap. Want those clouds extra puffy? All you need to do is brush your pom pom out with a wire brush (like a clean, new pet brush) and then trim it into shape.

0-3 Months

  • Work rounds 1 through 3 in red
  • Switch to orange for rounds 4 & 5
  • Switch to yellow for rounds 6 & 7
  • Switch to green for rounds 8 & 9
  • Switch to blue for rounds 10 & 11
  • Switch to purple for earflaps and both edgings

3-6 Months

  • Work rounds 1 through 4 in red
  • Switch to orange for rounds 5 & 6
  • Switch to yellow for rounds 7 & 8
  • Switch to green for rounds 9 & 10
  • Switch to blue for rounds 11 & 12
  • Switch to purple for earflaps and both edgings

6-12 Months

  • Work rounds 1 through 5 in red
  • Switch to orange for rounds 6 & 7
  • Switch to yellow for rounds 8 & 9
  • Switch to green for rounds 10 & 11
  • Switch to blue for rounds 12 & 13
  • Switch to purple for earflaps and both edgings

Toddler

  • Work rounds 1 through 7 in red
  • Switch to orange for rounds 8 & 9
  • Switch to yellow for rounds 10 & 11
  • Switch to green for rounds 12 & 13
  • Switch to blue for rounds 14 & 15
  • Switch to purple for earflaps and both edgings

Child

  • Work rounds 1 through 6 in red
  • Switch to orange for rounds 7 through 9
  • Switch to yellow for rounds 10 through 12
  • Switch to green for rounds 13 through 15
  • Switch to blue for rounds 16 through 18
  • Switch to purple for earflaps and both edgings

Teen/Adult

  • Work rounds 1 through 8 in red
  • Switch to orange for rounds 9 through 11
  • Switch to yellow for rounds 12 through 14
  • Switch to green for rounds 15 through 17
  • Switch to blue for rounds 18 through 20
  • Switch to purple for earflaps and both edgings

Have a great week (make sure you get some time to have fun crocheting)! If you have any questions about this hat or anything at all, please don’t hesitate to email me at email hidden; JavaScript is required.

New Pattern Release and Giveaway: Big Button Flowers – Set 2 – CLOSED

It is finally ready – the pattern for my second set of Big Button Interchangeable Flowers! These are so much fun to whip up and add to a purse or jacket to bring some new life into something old. They are also great get-noticed flowers to add to a hat or headband. If you like these flowers, make sure you check out my first set of Big Button Flowers too! Both sets of flowers fit over a 1.5″ button, giving you 8 different options to accessorize.

To celebrate the new release, the Big Button Flower – Set 2 Pattern will be 30% off through April 6th, 2012, no promo code needed. In addition to the savings, three lucky winners will get this pattern free!

HOW TO ENTER:

There will be four chances to win this pattern! Leave a separate comment on this blog post below for each entry to get your four chances:

  1. Out of the either set of Big Button Interchangeable Flowers, which is your favorite?
  2. Like Micah Makes on Facebook (just post “AAF” in the comment section if you are already a fan).
  3. Share a link to this blog post on your Facebook page or blog; be sure to tag Micah Makes on FB or link to your blog.
  4. Subscribe to my newsletter (again,you can post if you are already signed up too).

Three winners will be chosen at random at midnight PST on Sunday April 1st, and will be announced Monday morning. Good luck and thanks for stopping by!

Big Button Interchangeable Flowers – Set 2

$5.95 USD

Buy Pattern

This crochet pattern is for a set of four big, beautiful flowers that all attach to a 1.5″ button. The included flowers are a poppy, a marigold, a daisy and a carnation. Your options for accessorizing are limitless with this pattern. Make one of each flower or make each flower in lots of different colors. Attach your button to a hat, jacket, bag, anything, and you can instantly change your look by changing the flower on your button.

Difficulty Rating

Pattern is rated easy to intermediate.

Recommended Supplies
  • #4 Worsted Weight Yarn (I used cotton yarn but any worsted weight yarn will work, approximately 26-53 yards for each flower depending on which flower you are making, but any worsted weight yarn will work)
  • US G Hook (4.00 mm)
  • Yarn needle for sewing in yarn ends
  • 1.5″ Button

Licensing

You are welcome to sell products produced from this pattern, but I do ask that you credit me as the pattern designer as follows:

Pattern by Micah Makes
www.micahmakes.com

Flower Pictures

Pattern Testing: Big Button Interchangeable Flowers – Set 2 – CLOSED

Everything is in bloom here in central PA with all the beautiful weather we had been having lately, and it got me in the mood to make another set of Big Button Interchangeable Flowers. This second set includes instructions for four flowers – Carnation, Daisy, Poppy and Marigold – that all fit on a 1.5″ button.

It is extremely important to me that my patterns are clear and easy-to-follow with no mistakes. I know there are lots of people who would like to test and I want to give everyone the opportunity. I will be choosing three testers at random from the comments below on Monday, March 26th at noon EST. The testers will be responsible for testing all four flower designs. All testers will need to return pictures and notes/corrections by email to me by Thursday, March 29th. Pictures will only be for me to see how your projects turned out; pictures will not be shared in any way. If you cannot complete the project in the time allotted, please do not sign up. There will be more opportunities in the future to test and win free patterns.

Testers who return their pictures and notes in the given time frame will receive a free copy of the final pattern they tested, as well as a coupon code for 50% off any current or future pattern of their choice. If I do not hear back from you, you will be ineligible to test in the future.

If you are interested in testing, please leave one comment below. Thank you so much for your time and willingness to help!

Crochet Bunny Hat Pattern

It is just two weeks until Easter, and we simply can’t let a holiday pass by without making a variation of my free Versatile Earflap Hat Pattern – a bunny, of course! This hat would be such a cute photo prop and fun addition to your holiday events. I know this little cutie liked it so much she wanted to wear her bunny hat the entire time we played on the playground.

You can find the basic instructions for the hat here. I made my hat completely in white. Then follow the directions below to make the ears.

Outer Ears (make 2)

0-3 Month and 3-6 Month Sizes

  • Row 1: Ch 6, sc in 2nd ch from hook and in each ch across; ch 1 and turn. (5)
  • Row 2-5: Sc in each st across; ch 1 and turn. (5)
  • Row 6: 2 Sc in first st, sc in next 3 sts, 2 sc in last st; ch 1 and turn. (7)
  • Row 7-10: Sc in each st across; ch 1 and turn. (7)
  • Row 11: 2 Sc in first st, sc in next 5 sts, 2 sc in last st; ch 1 and turn. (9)
  • Row 12: Sc in each st across; ch 1 and turn. (9)
  • Row 13: Sc2tog, sc in next 5 sts, sc2tog; ch1 and turn. (7)
  • Row 14: Sc2tog, sc in next 3 sts, sc2tog; ch1 and turn. (5)
  • Row 15: Sc2tog, sc in next st, sc2tog; fasten off and weave in loose ends. (3)
  • Attach same color yarn in same st as first chain. Ch 1, work (sc, ch 1, sc) in corner, sc across to other corner, work (sc, ch 1, sc), sc evenly around the remainder or the ear and join with a sl st in the first sc; fasten off, leaving a long tail for sewing.

6-12 Month and Toddler Sizes

  • Row 1: Ch 7, sc in 2nd ch from hook and in each ch across; ch 1 and turn. (6)
  • Row 2-7: Sc in each st across; ch 1 and turn. (6)
  • Row 8: 2 Sc in first st, sc in next 4 sts, 2 sc in last st; ch 1 and turn. (8)
  • Row 9-14: Sc in each st across; ch 1 and turn. (8)
  • Row 15: 2 Sc in first st, sc in next 6 sts, 2 sc in last st; ch 1 and turn. (10)
  • Row 16: Sc in each st across; ch 1 and turn. (10)
  • Row 17: Sc2tog, sc in next 6 sts, sc2tog; ch1 and turn. (8)
  • Row 18: Sc2tog, sc in next 4 sts, sc2tog; ch1 and turn. (6)
  • Row 19: Sc2tog, sc in next 2 sts, sc2tog; fasten off and weave in loose ends. (4)
  • Attach same color yarn in same st as first chain. Ch 1, work (sc, ch 1, sc) in corner, sc across to other corner, work (sc, ch 1, sc), sc evenly around the remainder or the ear and join with a sl st in the first sc; fasten off, leaving a long tail for sewing.

Child and Teen/Adult Sizes

  • Row 1: Ch 8, sc in 2nd ch from hook and in each ch across; ch 1 and turn. (7)
  • Row 2-9: Sc in each st across; ch 1 and turn. (7)
  • Row 10: 2 Sc in first st, sc in next 5 sts, 2 sc in last st; ch 1 and turn. (9)
  • Row 11-19: Sc in each st across; ch 1 and turn. (9)
  • Row 20: 2 Sc in first st, sc in next 7 sts, 2 sc in last st; ch 1 and turn. (11)
  • Row 21: Sc in each st across; ch 1 and turn. (11)
  • Row 22: Sc2tog, sc in next 7 sts, sc2tog; ch1 and turn. (9)
  • Row 23: Sc2tog, sc in next 5 sts, sc2tog; ch1 and turn. (7)
  • Row 24: Sc2tog, sc in next 3 sts, sc2tog; ch1 and turn. (5)
  • Row 25: Sc2tog, sc in next st, sc2tog; fasten off and weave in loose ends. (3)
  • Attach same color yarn in same st as first chain. Ch 1, work (sc, ch 1, sc) in corner, sc across to other corner, work (sc, ch 1, sc), sc evenly around the remainder or the ear and join with a sl st in the first sc; fasten off, leaving a long tail for sewing.
Inner Ears (make 2)

0-3 Month and 3-6 Month Sizes

  • Row 1: Ch 5, sc in 2nd ch from hook and in each ch across; ch 1 and turn. (4)
  • Row 2-5: Sc in each st across; ch 1 and turn. (4)
  • Row 6: 2 Sc in first st, sc in next 2 sts, 2 sc in last st; ch 1 and turn. (6)
  • Row 7-10: Sc in each st across; ch 1 and turn. (6)
  • Row 11: 2 Sc in first st, sc in next 4 sts, 2 sc in last st; ch 1 and turn. (8)
  • Row 12: Sc in each st across; ch 1 and turn. (8)
  • Row 13: Sc2tog, sc in next 4 sts, sc2tog; ch1 and turn. (6)
  • Row 14: Sc2tog, sc in next 2 sts, sc2tog; ch1 and turn. (4)
  • Row 15: Sc2tog twice; fasten off and weave in loose ends. (2)
  • Attach same color yarn in same st as first chain. Ch 1, work (sc, ch 1, sc) in corner, sc across to other corner, work (sc, ch 1, sc), sc evenly around the remainder or the ear and join with a sl st in the first sc; fasten off and weave in loose end.

6-12 Month and Toddler Sizes

  • Row 1: Ch 6, sc in 2nd ch from hook and in each ch across; ch 1 and turn. (5)
  • Row 2-7: Sc in each st across; ch 1 and turn. (5)
  • Row 8: 2 Sc in first st, sc in next 3 sts, 2 sc in last st; ch 1 and turn. (7)
  • Row 9-14: Sc in each st across; ch 1 and turn. (7)
  • Row 15: 2 Sc in first st, sc in next 5 sts, 2 sc in last st; ch 1 and turn. (9)
  • Row 16: Sc in each st across; ch 1 and turn. (9)
  • Row 17: Sc2tog, sc in next 5 sts, sc2tog; ch1 and turn. (7)
  • Row 18: Sc2tog, sc in next 3 sts, sc2tog; ch1 and turn. (5)
  • Row 19: Sc2tog, sc in next st, sc2tog; fasten off and weave in loose ends. (3)
  • Attach same color yarn in same st as first chain. Ch 1, work (sc, ch 1, sc) in corner, sc across to other corner, work (sc, ch 1, sc), sc evenly around the remainder or the ear and join with a sl st in the first sc; fasten off and weave in loose end.

Child and Teen/Adult Sizes

  • Row 1: Ch 7, sc in 2nd ch from hook and in each ch across; ch 1 and turn. (6)
  • Row 2-9: Sc in each st across; ch 1 and turn. (6)
  • Row 10: 2 Sc in first st, sc in next 4 sts, 2 sc in last st; ch 1 and turn. (8)
  • Row 11-19: Sc in each st across; ch 1 and turn. (8)
  • Row 20: 2 Sc in first st, sc in next 6 sts, 2 sc in last st; ch 1 and turn. (10)
  • Row 21: Sc in each st across; ch 1 and turn. (10)
  • Row 22: Sc2tog, sc in next 6 sts, sc2tog; ch1 and turn. (8)
  • Row 23: Sc2tog, sc in next 4 sts, sc2tog; ch1 and turn. (6)
  • Row 24: Sc2tog, sc in next 2 sts, sc2tog; ch1 and turn. (4)
  • Row 25: Sc2tog twice; fasten off and weave in loose ends. (2)
  • Attach same color yarn in same st as first chain. Ch 1, work (sc, ch 1, sc) in corner, sc across to other corner, work (sc, ch 1, sc), sc evenly around the remainder or the ear and join with a sl st in the first sc; fasten off and weave in loose end.
Finishing

When you have all of you ear pieces made, line up the straight sides of one outer ear and one inner ear and place them wrong sides together (wrong side will be the back of your final round). Using the long tail from your outer ear, sew the two pieces together just through the backs of the stitches all the way around. Pinch the ear in half at the bottom across the straight edge. Sew along the edge to hold it in place and then sew the ear to the hat. Repeat with the other pieces. Lastly, I finished my hat off with braids of pastel colors on the earflaps.

Thanks so much for stopping by! If you have any questions, please feel free to leave a comment or email me at email hidden; JavaScript is required.

Colorblock Hat: Irish Edition

Happy St. Patrick’s Day! We have our green on today, do you? Although the weather will be too nice for earflap hats, I still made a variation of my free Versatile Earflap Hat Pattern inspired by the Irish flag. I know quite a few people who would love to wear this hat all year long!

To make one of your own, simply download the base pattern here, and then take note of where to change colors for the size you are making below. I finished my hats off with braids of green, white and orange.

0-3 Months

  • Work rounds 1 through 7 in green
  • Switch to white for rounds 8 through 10
  • Switch to orange for round 11, earflaps and both edgings

3-6 Months

  • Work rounds 1 through 8 in green
  • Switch to white for rounds 9 through 11
  • Switch to orange for round 12, earflaps and both edgings

6-12 Months

  • Work rounds 1 through 8 in green
  • Switch to white for rounds 9 through 12
  • Switch to orange for round 13, earflaps and both edgings

Toddler

  • Work rounds 1 through 9 in green
  • Switch to white for rounds 10 through 13
  • Switch to orange for rounds 14 & 15, earflaps and both edgings

Child

  • Work rounds 1 through 11 in green
  • Switch to white for rounds 12 through 16
  • Switch to orange for rounds 17 & 18, earflaps and both edgings

Teen/Adult

  • Work rounds 1 through 12 in green
  • Switch to white for rounds 13 through 18
  • Switch to orange for rounds 19 & 20, earflaps and both edgings

Have a great week and if you have any questions at all, don’t hesitate to email me at email hidden; JavaScript is required.

Shamrock Hat

Whether you are Irish or not, it is always fun to celebrate St. Patrick’s Day and wear a little green. I figured I would add a St. Patty’s touch to my Versatile Earflap Hat Pattern by attaching a great big shamrock.

The pattern I used for the shamrock can be found (free, of course) over at Crochet Spot. Rachel’s pattern was easy to follow, and I love how big the shamrock worked up in comparison to this itty, bitty 3-6 month size hat. The next time I make a hat like this I will test out some other ways to attach the shamrock besides sewing around all the edges. I think a little 3D effect could make this hat even cuter. If you give it a try, I would love to see what you do. You can email me at email hidden; JavaScript is required or find me on Facebook and share your creation there.

How do you like to wear your green – a hat, a shirt, jewelry, just a little or head-to-toe? Do you have any fun traditions for St. Patrick’s Day? I’m thinking we need to start some at our house.

Thanks for stopping by today and have a great week!

Crochet Monkey Hat Pattern

Here is another fun and easy variation on my free Versatile Earflap Hat Pattern, a Monkey Hat. If you don’t already have the hat pattern, you can download it here.

This hat is just like the Bear Hat, only you will attach the ears to the sides of the hat. I made my hat and ears in Vanna’s Choice yarn in Cranberry (my favorite red, especially for my Firefighter Helmet Pattern), trimmed in Sapphire, with Cranberry, Sapphire and White braids. Make the ears with an H hook according to the directions below for whichever size you are making. When the ears are completed, squish them in half, position them on the hat and sew in place.


Ears (make 2)

0-3 Month and 3-6 Month Sizes

  • Round 1: 6 Sc in a magic circle; do not join, use a stitch marker at the end of rounds if you need to. (6)
  • Round 2: 2 Sc in ea st around; do not join. (12)
  • Round 3: * 2 Sc in next st, sc in next 5 sts * repeat around; do not join. (14)
  • Round 4: Sc in each st around; do not join. (14)
  • Round 5: * Sc2tog, sc in next st, sc2tog, sc in next 2 sts * repeat around. (10) Sl st in next st and fasten off, leaving a long tail for sewing the ear to the hat.

6-12 Month and Toddler Sizes

  • Round 1: 6 Sc in a magic circle; do not join, use a stitch marker at the end of rounds if you need to. (6)
  • Round 2: 2 Sc in ea st around; do not join. (12)
  • Round 3: Sc in next 2 sts, * 2 sc in next st, sc in next st * repeat around; do not join. (17)
  • Round 4: Sc in each st around; do not join. (17)
  • Round 5: Sc2tog, sc in next 7 sts, sc2tog, sc in next 6 sts around; do not join. (15)
  • Round 6: * Sc2tog, sc in next 3 sts * repeat around. (12) Sl st in next st and fasten off, leaving a long tail for sewing the ear to the hat.

Child and Teen/Adult Sizes

  • Round 1: 6 Sc in a magic circle; do not join, use a stitch marker at the end of rounds if you need to. (6)
  • Round 2: 2 Sc in ea st around; do not join. (12)
  • Round 3: * 2 Sc in next st, sc in next st * repeat around; do not join. (18)
  • Round 4: * 2 Sc in next st, sc in next 8 sts * repeat around; do not join. (20)
  • Round 5-6: Sc in each st around; do not join. (20)
  • Round 7: * Sc2tog, sc in next 8 sts * repeat around; do not join. (18)
  • Round 8: * Sc2tog, sc in next 4 sts * repeat around. (15) Sl st in next st and fasten off, leaving a long tail for sewing the ear to the hat.

We had a lot of fun with this hat and I hope you will too! I would love to see the creations you are making if you would like to share them on my Facebook page. If you have any questions, please leave a comment or email me at email hidden; JavaScript is required. Thanks for stopping by!

Crochet Bear Hat Pattern

The kids and I haven’t been feeling our best this week, so we decided to make another animal hat to bring some smiles to our faces. I don’t think too many people could resist smiling when faced with an adorable kid in an adorable hat. Snuggling with this teddy bear sure made me feel better!

To make a bear hat of your own, follow the directions in my free Versatile Earflap Hat Pattern. I chose to make my entire hat including braids on the earflaps in one color, Vanna’s Choice yarn in Barley. Make the ears with an H hook according to the directions below for whichever size you are making. When the ears are completed, squish them in half, position them on the hat and sew in place.

Ears (make 2)

0-3 Month and 3-6 Month Sizes

  • Round 1: 6 Sc in a magic circle; do not join, use a stitch marker at the end of rounds if you need to. (6)
  • Round 2: 2 Sc in ea st around; do not join. (12)
  • Round 3: * 2 Sc in next st, sc in next 5 sts * repeat around; do not join. (14)
  • Round 4: Sc in each st around; do not join. (14)
  • Round 5: * Sc2tog, sc in next st, sc2tog, sc in next 2 sts * repeat around. (10) Sl st in next st and fasten off, leaving a long tail for sewing the ear to the hat.

6-12 Month and Toddler Sizes

  • Round 1: 6 Sc in a magic circle; do not join, use a stitch marker at the end of rounds if you need to. (6)
  • Round 2: 2 Sc in ea st around; do not join. (12)
  • Round 3: Sc in next 2 sts, * 2 sc in next st, sc in next st * repeat around; do not join. (17)
  • Round 4: Sc in each st around; do not join. (17)
  • Round 5: Sc2tog, sc in next 7 sts, sc2tog, sc in next 6 sts around; do not join. (15)
  • Round 6: * Sc2tog, sc in next 3 sts * repeat around. (12) Sl st in next st and fasten off, leaving a long tail for sewing the ear to the hat.

Child and Teen/Adult Sizes

  • Round 1: 6 Sc in a magic circle; do not join, use a stitch marker at the end of rounds if you need to. (6)
  • Round 2: 2 Sc in ea st around; do not join. (12)
  • Round 3: * 2 Sc in next st, sc in next st * repeat around; do not join. (18)
  • Round 4: * 2 Sc in next st, sc in next 8 sts * repeat around; do not join. (20)
  • Round 5-6: Sc in each st around; do not join. (20)
  • Round 7: * Sc2tog, sc in next 8 sts * repeat around; do not join. (18)
  • Round 8: * Sc2tog, sc in next 4 sts * repeat around. (15) Sl st in next st and fasten off, leaving a long tail for sewing the ear to the hat.

Bonus – you can make some pretty cute Valentines with this hat too! Hope you love it and if you have any questions, please leave a comment or email me at email hidden; JavaScript is required.