Happy New Year!

2011 was such a fun and exciting year for me. Opening my crochet pattern shop has been a huge blessing for my family and I want to thank all of you for your support. I hope you have enjoyed the patterns and I’m looking forward to coming up with some great new designs in 2012!

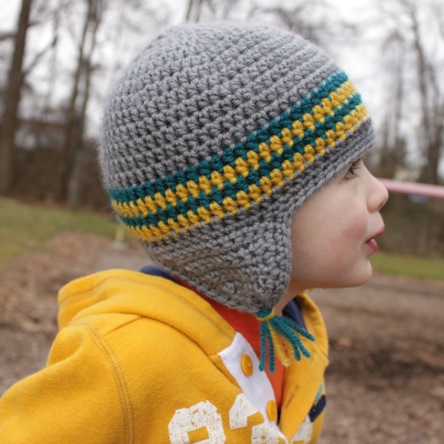
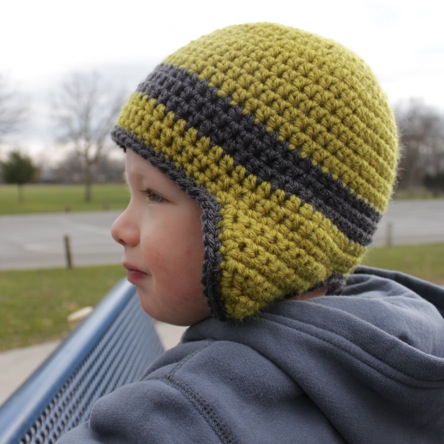
I want to start the year off with another free pattern, the Versatile Earflap Hat Pattern. The instructions in this pattern will show you how to make a basic, solid-color hat with rounded earflaps. I call this hat versatile because there are so many different things you can do with it, which I plan to share with you throughout the year. Go get your free download today, and stay tuned for some fun ideas.

Thanks again for a great year, and from our family to yours, we wish you a happy, healthy and prosperous new year!

Free Pattern: Versatile Earflap Hat Pattern

Here is an easy pattern for a versatile earflap hat. The best part – it’s free! It is made with #4 Worsted/Aran weight yarn and the pattern includes sizes for newborn through adult. There are so many different things you can do with this pattern, and I’m planning on sharing many ideas throughout the year so stay tuned.

If you like this pattern, sign up for my free monthly newsletter to be notified of other free pattern releases.

Hat Pictures


Hugs & Kisses Headwrap Pattern Winners Announced

Thank you to everyone for entering to win my latest pattern, the Hugs & Kisses Headwrap! It looks like most of us are still working on our handmade gifts. I hope everyone can get them done with as little stress as possible and enjoy their holidays!! If you didn’t win, don’t forget that this pattern will be 30% off  (that’s only $2.76!) through December 19th in the pattern store.

And the winners are….


New Pattern Release and Giveaway: Hugs & Kisses Headwrap – CLOSED

I am so excited to announce the release of my newest pattern – the Hugs & Kisses Headwrap! I love the headwrap trend and am happy to finally have one in my shop. This pattern works up so quickly and uses so little yarn. I am going to keep whipping them out and hopefully have a special handmade gift for all the women and girls on my list.

To celebrate the new release, the Hugs & Kisses Headwrap Pattern will be 30% off through December 19th, 2011, no promo code needed. In addition to the savings, three lucky winners will get this pattern free!

HOW TO ENTER:

There will be four chances to win this pattern! Leave a separate comment on this blog post below for each entry to get your four chances:

  1. Have you been making handmade holiday gifts this year, and are you still working on them like me?
  2. Like Micah Makes on Facebook (just post “AAF” in the comment section if you are already a fan).
  3. Share a link to this blog post on your Facebook page or blog; be sure to tag Micah Makes on FB or link to your blog.
  4. Subscribe to my monthly newsletter (again,you can post if you are already signed up too).

Three winners will be chosen at random at midnight PST on Wednesday, December 14th, and will be announced Thursday morning. Good luck and thanks for stopping by!

Hugs & Kisses Headwrap


$3.95 USD

Buy Pattern

I just love all the crochet and knit headwraps you see everywhere lately, and have been wanting to add some to my pattern collection. I call this one the Hugs and Kisses Headwrap because the stitches make little X’s and O’s. It can be made in two colors to really highlight the X’s and O’s, or just in one color for a fun textured look. This pattern works up quickly and makes a super-sweet little gift.

Pattern Sizes

  • One size – adjustable to fit Child through Adult
Difficulty Rating

Pattern is rated easy-intermediate.

Recommended Supplies
  • #4 Worsted Weight Yarn (I used Vanna’s Choice), approximately 76 yards total, 34 yards in color A and 42 yards in color B
  • US H Hook (5.00 mm)
  • Yarn needle for sewing in yarn ends
  • 1 Inch Button(s)
  • Needle and thread to sew buttons

Licensing

You are welcome to sell products produced from this pattern, but I do ask that you credit me as the pattern designer as follows:

Pattern by Micah Makes
www.micahmakes.com

Headwrap Pictures

Look Inside

Pattern Testing: Hugs and Kisses Headwrap -Closed

I just love all the crochet and knit headwraps you see everywhere lately, and have been wanting to add some to my pattern collection. I call this one the Hugs and Kisses Headwrap because the stitches make little X’s and O’s. It can be made in two colors to really highlight the X’s and O’s, or just in one color for a fun textured look.

It is extremely important to me that my patterns are clear and easy-to-follow with no mistakes. I know there are lots of people who would like to test and I want to give everyone the opportunity. I will be choosing testers at random from the comments below on Tuesday, December 6th at noon EST. All testers will need to return pictures and notes/corrections by email to me by Thursday, December 8th. I know this is a really short amount of time, but this project is small and should not take long. Pictures will only be for me to see how your projects turned out and how it fits; pictures will not be shared in any way. If you cannot complete the project in the time allotted, please do not sign up. There will be more opportunities in the future to test and win free patterns.

Testers who return their pictures and notes in the given time frame will receive a free copy of the final pattern they tested, as well as a coupon code for 50% off any current or future pattern of their choice. If I do not hear back from you, you will be ineligible to test in the future.

I will be choosing four tester – two to complete a two-color headwrap and two to complete a solid color headwrap. If you are interested in testing, please leave one comment below indicating your preference of which to test. The first four numbers selected will get to test the pattern, but I will try to give you your first preference if possible.

Thank you so much for your time and willingness to help!

Crochet Hook Roll Winner

Thank you to everyone for entering to win the crochet hook roll! It was fun to read everyone’s tips on how to store your crochet hooks. I may use some to take control of my craft supplies. Plus I totally want to go to the thrift store to find cool sweaters to make more hook rolls.

And the winner is….


Congratulations, Megan! Check your inbox for a message from me. Hope everyone has a great day. Thanks for stopping by!

Crochet Hook Roll Giveaway – CLOSED

Remember how in the Crochet Hook Roll DIY post I said that you could use the other side of your sweater to make one for a friend? Well I did…for one of you!

This hook roll is exactly like the one in the tutorial. It has slots to hold 8 crochet hooks up to size K, and ties closed with a cute ribbon.

HOW TO ENTER:

To enter, simply leave one comment below. If you have a great tip for storing your crochet hooks or other craft supplies, please share. Or just say hi. It’s up to you. The winner will be chosen at random at midnight PST on Saturday, December 3rd, and will be announced Sunday morning. Good luck and thanks for stopping by!

This giveaway is now closed – winner announced here.

Crochet Hook Roll DIY

As a craft addict, I have accumulated tons of supplies over the years and have a constant struggle with finding the best way to organize and store things. My crochet hooks are currently stored in an old baby wipes tub. I think they deserve a better home – how about you? So I found an old sweater that had been felted in with my fabric stash and got to work.

Supplies

  • 100% Wool Felted Sweater – felting a sweater is so simple and there are great tutorials all over the web, such as here or here
  • Fabric Scissors
  • Ruler
  • Ribbon to tie roll closed
  • Needle and Thread for sewing (you can use a sewing machine or sew by hand)
Instructions


Step 1: Lay your hooks on top of your sweater and decide how wide you want to cut your fabric. You should make your cut at least 3 inches wider than your longest hook.


Step 2: Make your cuts at your desired width as far up the sweater as possible, and then cut across. My measurements after cutting were approximately 9″ x 12″.


Step 3: Fold one long side up 2″ and pin in place. There is no need to finish the edges; they will not fray.


Step 4: Sew a straight line down the edge of the folded part


Step 5: Depending on how many slots you want and how wide you want them to be, continue sewing straight lines down through the folded part. To keep things easy, I made my slots even and followed the stripes as a guide. They are about 1/2″ wide and I made 8 slots to hold hooks B, E, F, G, H, I, J and K.


Step 6: Insert your hooks into the slots, fold the top edge over the hook tips and pin in place.


Step 7: Remove the hooks and sew a straight line down the edge of the top fold and a straight line down the top fold at a distance equal the the edge of your last slot.


Step 8: Trim the fabric along the folds to the end and next to the last slot on both the top and bottom.


Step 9: Cut a piece of ribbon 30″ long. Sew the center of the ribbon down 3″ to 4″ from the end.


Step 10: Insert crochet hooks.


Step 11: Roll.


Step 12: Tie closed and trim your ribbon ends to the desired length.

Now you have a lovely place to keep all your hooks, and the best part is you still have the other side of your sweater to make one for a friend!

Guatemala Hat Project

In October, a friend of mine went on a mission trip to Guatemala to help out in a malnutrition center. Brandie was extremely touched by the experience and wanted to find a way to continue blessing the babies and children from the center after she returned home. She decided to use her crochet talents to make fun hats to send to all the children at the center. She needs some help to reach her goal, so I was hoping I could call on some of my crochet friends.

I think it is so important to use the gifts we are given to give back and help others. Please check out Brandie’s blog to read about her experience and her Guatemala Hat Project, and consider helping out. To say thank you, I am offering a free pattern of choice to anyone who makes a donation. Again, please see Brandie’s blog for the full details on the project, but here are a few guidelines to be eligible for a free pattern from my shop:

  • Fun animal hats are preferred, but any hat that is bright and cheery will work. Brandie is collecting hats in all sizes from newborn to child.
  • Hats must be postmarked by Friday, November 11th to make it to Brandie on time. You can find her address here. I’m sorry this doesn’t give you much time, but the hats need to get to the children before it gets too cold.
  • One free pattern per person, but please feel free to donate as many hats as you would like.
  • Please include your name and email in with your donation so that I can send your free pattern code.

Thank you so much for giving of your time and talents! I know the love you put into your hats will be felt by all these children!!