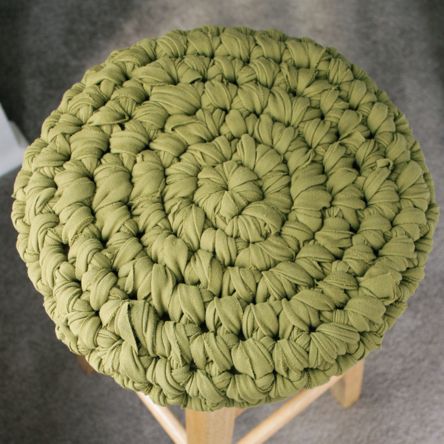
I have always loved the idea of crocheting and knitting with unusual “yarn” sources. I have made napkin rings by knitting wire and a fluffy bathroom rug out of fleece. Those projects had such fun results, so I turned to fabric yarn again when I wanted to make a cover for plain and uncomfortable kitchen stool.
Here are the steps I used to make yarn from a piece of knit fabric.
 Step 1: Fold the fabric in half with the folded edge closest to you.
 Step 2: Cut into the folded edge at intervals of however wide you want your strips to be (I made mine 3 inches wide).
 Step 3: Continue cutting across the width of the fabric until a few inches from the raw edges. It is okay if your cuts are not completely straight. Any mistakes will be hidden in the stitches.
 Step 4: Cut through the raw edge of the top layer only on every other cut.
 Step 5: Fold the top layer of the fabric back so that you can see the bottom layer.
 Step 6: Cut through the raw edge on the bottom layer only on the cuts opposite of the top layer.
 Step 7: Trim some of the fabric around the corners off so that there isn’t so much bulk in the places when the fabric yarn turns. Again, this does not need to be extremely neat.
My fabric was 2.5 yards long, so I continued using these steps for a few cuts at a time, and crocheted with whatever length I cut until I ran out. Then I made a few more cuts and so on. I found this method easier than trying to wind all of that fabric into a ball. Also you won’t cut fabric that you don’t need, so you can save it for another project.


Oh LOVE this! I actually saw a round ottoman once that was crocheted with fabric yarn and wanted to make my own, I even bought the fabric but didn’t know how to go about cutting it without having to sew the strips together! Now I can’t wait to try it! Thanks!
Awesome! I a TON of various fabrics. i am so going to be making yarn out of some. 🙂 Definitely going to try the bathroom and/or kitchen rug thing. Again…awesome! 🙂
It looks awesome. But i don’t understand what needles did you use..and you went in circles starting from the middle……it looks super but so difficult.
Hi, Ophelia! You can can view all the details about making the stool cover in this other post: http://www.micahmakes.com/blog/crochet-stool-cover. Let me know if you have any other questions. Thanks!
Yes! Just finished my first one. So happy with how it turned out. I made this one out of an old jersey sheet that was just taking up space in the closet. It was simple but sure did give my arm a workout! LOL! Thanks so much for this tutorial. I’m going to make two more this week!
PS – I was going to send a pic but I don’t know how to insert it here.
♥
It is definitely a workout! Your arms must still be sore if you made two more!! I would love to see how yours turned out if you want to send me an email (email hidden; JavaScript is required) or share it on my Facebook page (http://www.facebook.com/pages/Micah-Makes-Crochet/188661897812727). Thanks!